

Ingredients
Equipment
Notes
1. Gather Your Ingredients and Supplies
You'll need apples, sugar, water, and a large jar. If you want to use apple scraps (cores and peels), this method works just as well. Use organic apples for the best results since pesticides could slow the fermentation process. Make sure you have a clean glass jar, cloth, and rubber band to cover the jar during fermentation.
2. Wash and Chop the Apples
If you're using whole apples, wash them well to remove any wax or dirt. Cut them into small chunks—there’s no need to peel or core them unless you prefer using scraps. If using only peels and cores, collect enough to fill to the neck of your jar.
 3. Fill Jar With Apples
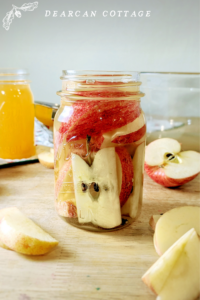
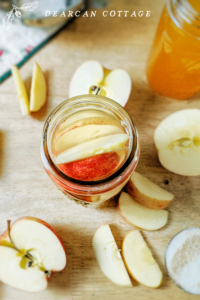
Fill your jar with organic, unwaxed apple chunks (or scraps) about three-quarters full or just below the neck of the jar. If you have unwanted apple cores, bruised spots, or peels, you can use what would have been wasted to make apple cider vinegar. This is the beautiful thing about making your own homemade apple cider vinegar, is you can utilize the whole apple, without waste!
Totally optional, but you can add your "mother of vinegar", or a splash of leftover vinegar, at this step if you have it. If you are starting this from scratch without a "mother" SCOBY, no worries this recipe will still work!
3. Fill Jar With Apples
Fill your jar with organic, unwaxed apple chunks (or scraps) about three-quarters full or just below the neck of the jar. If you have unwanted apple cores, bruised spots, or peels, you can use what would have been wasted to make apple cider vinegar. This is the beautiful thing about making your own homemade apple cider vinegar, is you can utilize the whole apple, without waste!
Totally optional, but you can add your "mother of vinegar", or a splash of leftover vinegar, at this step if you have it. If you are starting this from scratch without a "mother" SCOBY, no worries this recipe will still work!
 4. Pour In Filtered Water
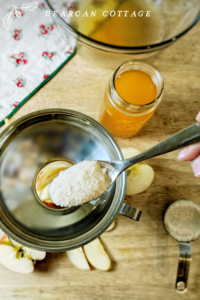
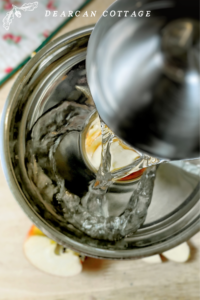
You’ll need enough sugar water to cover the apples or scraps in your jar (one tablespoon of sugar per one cup of water). The sugar feeds the natural bacteria and yeast, helping the fermentation process. Leave at least an inch of space at the top of the jar.
5. Add Sugar to the Jar
Pour the sugar over the apples and stir until everything is submerged. You need one tablespoon of sugar per one cup of water. I prefer raw organic cane sugar for all it health benefits, but you can use what you have to get it started.
6. Cover the Jar with Cloth
Use a clean cloth or coffee filter to cover the jar. Secure it with a rubber band. This prevents dust and bugs from getting in while allowing airflow, which is essential for fermentation. Avoid sealing the jar with a lid, as this can trap gases and might cause the jar to explode.
7. Store the Jar in a Warm, Dark Place
Place your jar in a warm spot away from direct sunlight. A kitchen cabinet or shelf works well. Keep the jar at about room temperature (60–80°F) to ensure proper fermentation. I like to tuck mine close by to the toaster oven, not touching, or overly warm too often, but it did the job well.
8. Stir the Mixture Daily
If your apples are floating to the top, and you don't have a weight, you'll want to push those apples down and stir with a clean spoon daily. This helps prevent mold and ensures even fermentation. The apples might start to sink after awhile, so you can just check to see how it's developing, making sure there's no bad bacteria growth, that looks fussy or black. After about one to two weeks, you’ll notice bubbles forming, a sign that fermentation has started.
4. Pour In Filtered Water
You’ll need enough sugar water to cover the apples or scraps in your jar (one tablespoon of sugar per one cup of water). The sugar feeds the natural bacteria and yeast, helping the fermentation process. Leave at least an inch of space at the top of the jar.
5. Add Sugar to the Jar
Pour the sugar over the apples and stir until everything is submerged. You need one tablespoon of sugar per one cup of water. I prefer raw organic cane sugar for all it health benefits, but you can use what you have to get it started.
6. Cover the Jar with Cloth
Use a clean cloth or coffee filter to cover the jar. Secure it with a rubber band. This prevents dust and bugs from getting in while allowing airflow, which is essential for fermentation. Avoid sealing the jar with a lid, as this can trap gases and might cause the jar to explode.
7. Store the Jar in a Warm, Dark Place
Place your jar in a warm spot away from direct sunlight. A kitchen cabinet or shelf works well. Keep the jar at about room temperature (60–80°F) to ensure proper fermentation. I like to tuck mine close by to the toaster oven, not touching, or overly warm too often, but it did the job well.
8. Stir the Mixture Daily
If your apples are floating to the top, and you don't have a weight, you'll want to push those apples down and stir with a clean spoon daily. This helps prevent mold and ensures even fermentation. The apples might start to sink after awhile, so you can just check to see how it's developing, making sure there's no bad bacteria growth, that looks fussy or black. After about one to two weeks, you’ll notice bubbles forming, a sign that fermentation has started.
 9. Strain Out the Apples, Saving The "Mother"
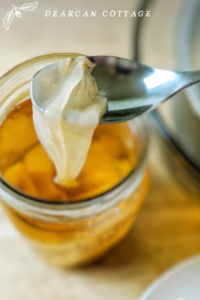
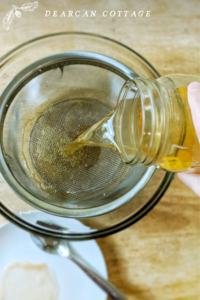
Once the bubbling slows down and it starts to smell less sweet and more like vinegar, strain out the apple pieces using a fine mesh strainer or cheesecloth. This should take around 4 weeks or a few months depending on how warm your ACV is. If your ACV was placed somewhere too cold it will slow down the process. Return the liquid to the jar. This cloudy liquid is the base of your vinegar.
Don't forget to save the SCOBY, called the "mother", a white film that is naturally occurring in vinegar making. It can help further develop your vinegar and be shared to make new vinegar! Place it in your jar of freshly homemade apple cider vinegar.
10. Let It Ferment Again
Cover the liquid with the cloth and leave it in the same warm, dark place for another 3–4 weeks. The longer the mixture sits the stronger your vinegar will smell and taste.
11. Store with a lid someplace cool, and enjoy!
Volia! You have made homemade apple cider vinegar from scratch. Read the rest of the blog to see how you can make this system last all year round!
9. Strain Out the Apples, Saving The "Mother"
Once the bubbling slows down and it starts to smell less sweet and more like vinegar, strain out the apple pieces using a fine mesh strainer or cheesecloth. This should take around 4 weeks or a few months depending on how warm your ACV is. If your ACV was placed somewhere too cold it will slow down the process. Return the liquid to the jar. This cloudy liquid is the base of your vinegar.
Don't forget to save the SCOBY, called the "mother", a white film that is naturally occurring in vinegar making. It can help further develop your vinegar and be shared to make new vinegar! Place it in your jar of freshly homemade apple cider vinegar.
10. Let It Ferment Again
Cover the liquid with the cloth and leave it in the same warm, dark place for another 3–4 weeks. The longer the mixture sits the stronger your vinegar will smell and taste.
11. Store with a lid someplace cool, and enjoy!
Volia! You have made homemade apple cider vinegar from scratch. Read the rest of the blog to see how you can make this system last all year round!
3. Fill Jar With Apples
Fill your jar with organic, unwaxed apple chunks (or scraps) about three-quarters full or just below the neck of the jar. If you have unwanted apple cores, bruised spots, or peels, you can use what would have been wasted to make apple cider vinegar. This is the beautiful thing about making your own homemade apple cider vinegar, is you can utilize the whole apple, without waste!
Totally optional, but you can add your "mother of vinegar", or a splash of leftover vinegar, at this step if you have it. If you are starting this from scratch without a "mother" SCOBY, no worries this recipe will still work!
4. Pour In Filtered Water
You’ll need enough sugar water to cover the apples or scraps in your jar (one tablespoon of sugar per one cup of water). The sugar feeds the natural bacteria and yeast, helping the fermentation process. Leave at least an inch of space at the top of the jar.
5. Add Sugar to the Jar
Pour the sugar over the apples and stir until everything is submerged. You need one tablespoon of sugar per one cup of water. I prefer raw organic cane sugar for all it health benefits, but you can use what you have to get it started.
6. Cover the Jar with Cloth
Use a clean cloth or coffee filter to cover the jar. Secure it with a rubber band. This prevents dust and bugs from getting in while allowing airflow, which is essential for fermentation. Avoid sealing the jar with a lid, as this can trap gases and might cause the jar to explode.
7. Store the Jar in a Warm, Dark Place
Place your jar in a warm spot away from direct sunlight. A kitchen cabinet or shelf works well. Keep the jar at about room temperature (60–80°F) to ensure proper fermentation. I like to tuck mine close by to the toaster oven, not touching, or overly warm too often, but it did the job well.
8. Stir the Mixture Daily
If your apples are floating to the top, and you don't have a weight, you'll want to push those apples down and stir with a clean spoon daily. This helps prevent mold and ensures even fermentation. The apples might start to sink after awhile, so you can just check to see how it's developing, making sure there's no bad bacteria growth, that looks fussy or black. After about one to two weeks, you’ll notice bubbles forming, a sign that fermentation has started.
9. Strain Out the Apples, Saving The "Mother"
Once the bubbling slows down and it starts to smell less sweet and more like vinegar, strain out the apple pieces using a fine mesh strainer or cheesecloth. This should take around 4 weeks or a few months depending on how warm your ACV is. If your ACV was placed somewhere too cold it will slow down the process. Return the liquid to the jar. This cloudy liquid is the base of your vinegar.
Don't forget to save the SCOBY, called the "mother", a white film that is naturally occurring in vinegar making. It can help further develop your vinegar and be shared to make new vinegar! Place it in your jar of freshly homemade apple cider vinegar.
10. Let It Ferment Again
Cover the liquid with the cloth and leave it in the same warm, dark place for another 3–4 weeks. The longer the mixture sits the stronger your vinegar will smell and taste.
11. Store with a lid someplace cool, and enjoy!
Volia! You have made homemade apple cider vinegar from scratch. Read the rest of the blog to see how you can make this system last all year round!